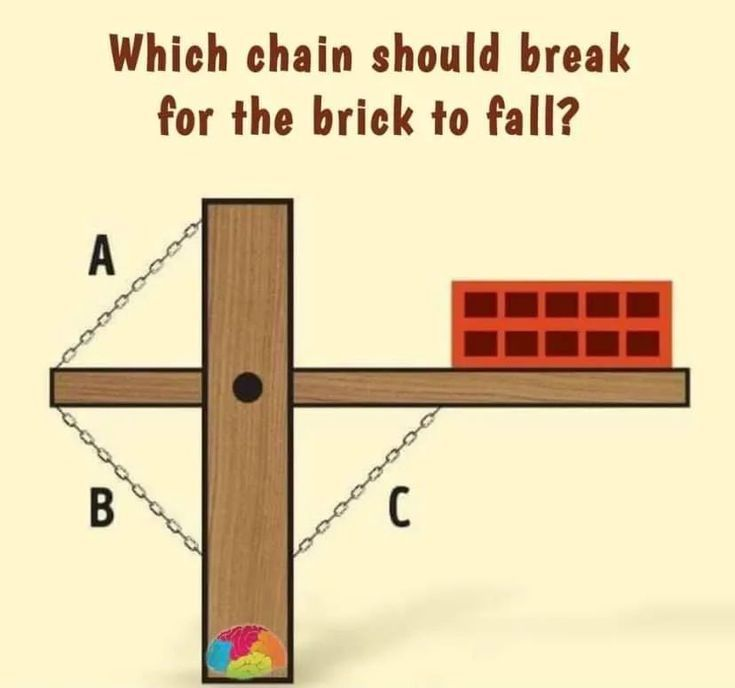
Picture This: A brick rests quietly on the right end of a horizontal wooden bar, held up by three chains—A, B, and C. At first glance, it might look like a classic brain teaser, but here’s the twist: only one chain needs to snap for the brick to tumble. The challenge? Figure out which one. It might seem puzzling at first, but once we break it down, the answer becomes surprisingly clear.
Breaking It Down: The Physics Behind the Fall
To crack this puzzle, we need to understand how the brick’s weight affects the system. The brick sits on the far right end of a horizontal wooden bar, and gravity pulls it downward. This creates a tilting moment—basically, it wants to tip the bar—which in turn affects the tension and compression in each of the three chains.
Chain C: All About Compression
Chain C is attached underneath the right side of the bar, directly below the brick. At first, it might seem like breaking this chain would drop the brick—but not so fast. Here’s the key: Chain C is under compression, not tension.
Think of it like pushing on a spring—it’s being squeezed, not stretched. And since a chain can’t “snap” from compression the same way it can from tension, breaking Chain C doesn’t change a thing. The brick stays exactly where it is.

Chain A: Another Case of Compression
Next up, Chain A—positioned on the left side of the horizontal bar. Like Chain C, it’s not doing any pulling—it’s being pushed on. This means it’s also under compression. The bar presses down on it, and it pushes right back. So if Chain A breaks? Nothing dramatic happens. The structure holds, and the brick stays right where it is.
Chain B: The Game-Changer
Now here’s where things get interesting.
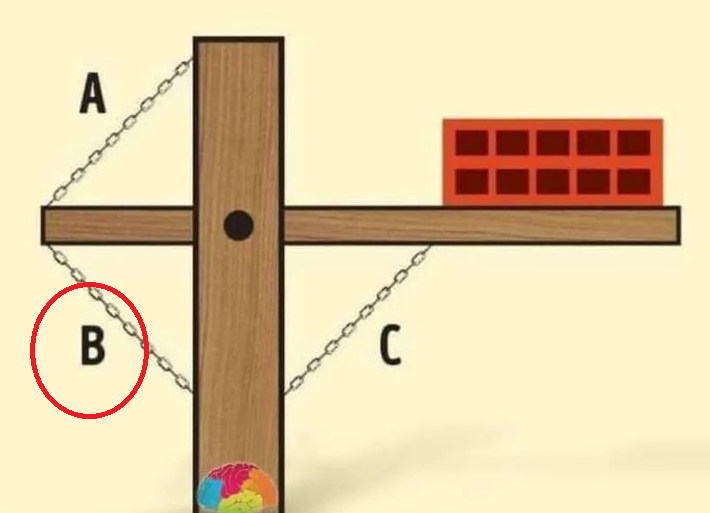
Chain B, located below the left side of the bar, is under tension—and that changes everything. Picture a tightrope or a stretched rubber band. Tension means it’s being pulled tight, countering the force of the brick on the other side.
So what happens if Chain B breaks?
The left side of the bar lifts upward, thanks to the unbalanced weight of the brick on the right. That shift tilts the entire bar—and just like that, the brick tumbles down.
Why Breaking Chain B Is the Key
In this setup, it’s not about how heavy the brick is—it’s about which chain is holding the system together. Chain B is the unsung hero keeping the left side grounded. Remove it, and the balance is gone.
So if your goal is to make the brick fall?
Chain B is the one to break.

The Physics Behind It: Why Chain B Must Break
At the heart of this puzzle lies a simple principle of physics: torque and balance. The brick resting on the right end of the bar creates a clockwise torque—a rotational force that tries to tip the bar down on that side.
So what’s stopping it?
Chain B. Positioned below the left side of the bar, it’s under tension, actively pulling to resist that rotation. It’s the chain keeping everything in balance.
But the moment Chain B snaps, that balance disappears. The left side of the bar lifts, the right side drops, and with nothing left to support it… the brick falls.
Visualizing the Moment: Think Seesaw
Imagine a seesaw. There’s a heavy object on one end, and the other end is tied down with a rope—just like Chain B. Now picture the rope suddenly breaking.
What happens?
The heavy side slams downward, while the light end swings up. That’s exactly what’s going on here. The brick acts like the weight, and Chain B is the rope holding it all together. Break the tension, and gravity takes over.
Why Chains A and C Don’t Do the Trick
To understand the brilliance of this setup, you’ve got to grasp why Chains A and C simply don’t work if your goal is to drop the brick.
Both chains are under compression, not tension. Think of them like sturdy props—they’re holding the bar steady, not fighting against the weight of the brick. Removing either one doesn’t disturb the balance in any meaningful way. The bar might shift slightly, maybe even wobble—but it won’t tip enough to send the brick falling.
In short: Chains A and C help hold things up, but they’re not doing the heavy lifting when it comes to torque.
The Final Verdict: Chain B Is the One
When it comes to making the brick fall, Chain B is the key. It’s the only chain under tension, actively resisting the brick’s weight and preventing the bar from tipping. Break that chain, and the balance is gone—the bar lifts on the left, drops on the right, and the brick has nowhere to go but down.
The Takeaway
Physics isn’t just about forces—it’s about how they interact.
Only one chain truly holds the system in check.
Break Chain B, and you break the balance.
Tension vs. Compression: The Key to Cracking the Code
When solving a problem like this, it all comes down to one crucial concept: the difference between tension and compression.
Chains under compression (like A and C) are being pushed—they help stabilize the structure, but they don’t actively hold anything up. The chain under tension, on the other hand, is pulling against the force of gravity—and that’s exactly what Chain B is doing.
So if you’re ever faced with a setup like this—whether it’s a real-world structure or a tricky brain teaser—remember this:
Break the chain under tension, and you break the balance.
In this case, that chain is B.
Conclusion: Physics, Simplified
Sometimes, the smartest solutions come from understanding the simplest principles.
This scenario is a perfect example of how torque, tension, and compression all work together. Chains A and C act like silent supporters, just keeping things steady. But Chain B is the hero doing the hard work—counteracting the torque caused by the brick’s weight.
Take that away, and the system collapses—the brick falls.
A clever little reminder that physics isn’t just about equations—it’s about how forces interact in the real world.